As we move through the growing season, I’ve been getting more questions about vine training. So, I wanted to share a quick refresher and include slides I’ve used before (with more visuals) to support these conversations. At this point in the season, our main focus is maintaining healthy tissue that supports root development and future productivity — but it’s never too early to start thinking about structure.
Vine training isn’t just about keeping the vineyard tidy. It’s about maximizing sunlight exposure, improving airflow, supporting fruit development, and setting the foundation for decades of healthy growth.
Whether you’re planting a new block or reevaluating an old one, it’s worth returning to the basics. Here are two simple reminders:
- Don’t be afraid to cut. You’ll be removing more than 75% of last year’s growth. That’s expected.
- Mistakes aren’t fatal. Pruning is an annual task — the vine gives you another chance next year.
Approach it with curiosity, not panic. Proper pruning supports vine balance, longevity, and better fruit. In most regions, late winter through early spring (January–March) is the best time to prune. Prune too early, and you may risk frost damage, but you want to prune while the vines are still dormant.
Year 1: Establishing the Trunk
When you plant a new grapevine, it’s often just a tangle of roots and a few spindly shoots. The goal in year one is simple: establish a strong, straight trunk.
At planting:
- Choose the healthiest shoot and cut it back to three buds.
- As new growth emerges, select the strongest upright shoot and tie it to a stake.
- If vigor is high, remove the other shoots to direct energy toward trunk development.
- If vigor is low, you may “bush” the vine to maximize leaf area, but this is not often necessary in our region.
During the growing season:
- Continue tying the chosen shoot as it grows.
- Keep it straight and upright — this becomes the permanent trunk.
- Grow tubes may help deter deer, but keep an eye on what’s happening inside them to avoid insect pest, fungal or heat issues.
Year 1 Winter: Reaching the Wire
By winter, your vine should be approaching the lowest trellis wire.
- If it hasn’t reached the wire: Cut back to three buds and let it try again next season. Patience pays off in the long run.
- If it reaches the wire or slightly exceeds it:
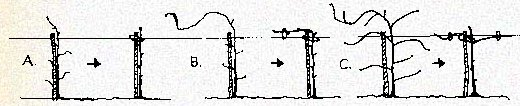
- Trim it just above the wire and tie it into position.
- If it’s grown beyond the wire by several inches, tie it to the stake, prune back a few buds past the wire, and gently arch the rest down to the wire to form lateral arms.
- In cases where strong side shoots emerged near the wire, you can train two of them outward along the wire as your arms, and trim the main trunk just above them.
These training cuts help shape the vine into a balanced, manageable structure for future fruiting.
Year 2 and 3 Vine Training
By year two, you’re no longer building a trunk — you’re laying out the fruiting structure.
Year 2: Training for Cane or Cordon Systems
As the vine wakes up in spring, shoots will emerge from the buds along the 1-year-old trunk.
- Select two shoots — one on each side of the trunk, roughly 6–8 inches below the training wire.
- Train each shoot horizontally along the wire. These become your future cordons (in cordon systems) or fruiting arms (in cane-pruned systems).
- Remove all other shoots, especially those below this point, while they’re still soft and green.
- Any flower clusters should be thinned or removed — the priority this year is establishing the vine’s structure, not producing a crop.
- Remove suckers that grow from the base of the vine throughout the season.
Year 3: Cordon-Trained Vines
If you’re building permanent cordons:
- Continue training the cordons along the wire. Choose only strong, well-positioned laterals to grow in opposite directions.
- If your cordon arms are too close to the wire (resulting in a flat, upward angle), they may be prone to splitting under fruit weight. Consider setting your vine head slightly below the wire to avoid this.
- During pruning, retain short spurs (2–3 buds) along each cordon to produce fruiting shoots.
- Keep a few backup spurs near the base of the cordon in case of future damage.
Year 3: Cane-Pruned Vines
If you’re using a cane-pruned system:
- The arms trained along the wire last year will produce multiple shoots this season.
- At the end of the season, select 1–2 canes per side from near the trunk to become your fruiting canes.
- Each should be pruned to 8–10 buds and tied along the wire.
- Also select 1–2 replacement spurs, pruned to 2 buds, for the next season.
- As with young vines, thin to one cluster per shoot if necessary to prevent overcropping.
By the end of the third year, your vine should be well-structured and ready for consistent production.
Pruning Mature Vines: Producing and Renewing
Grapevines grow fruit on shoots that emerge from last year’s canes. The goal in pruning mature vines is to remove old wood, position this year’s fruiting canes, and leave a few renewal spurs for next year.
Cordon Pruning (most common in our area):
- Train two permanent arms (cordons) along the trellis wire.
- Each season, leave short spurs (2–3 buds) spaced along the cordon.
- These spurs produce fruiting shoots and are renewed annually.
- If spurs get too long or crowded, cut back to a new shoot closer to the cordon. Or you can fully renew the cordon by training a new cane.
Cane Pruning:
- Keep a permanent trunk.
- Select 1–2 healthy canes on each side of the vine, ideally close to the trunk, about the width of a pencil, with evenly spaced buds.
- Tie these to the wire and trim to 8–10 buds each.
- Leave one or two two-bud spurs at the base to grow replacement canes next year.
- Remove everything else.
